
Easy steps to custom WooCommerce product page with Elementor
Do you want to create a custom WooCommerce product page with Elementor?
As an eCommerce website owner, you need to provide your customers unique and better user experience to attract them. Customizing your product page gives you more control over your online store. You can customize your product page based on your user’s needs and demands.
Elementor offers you many features to customize your WooCommerce product page. With its drag and drop elements, you can add different elements and functionalities to your WooCommerce product page. You can add a custom design to your product page as you want.
Without Elementor if you want to design your product page you need to add lines of code, PHP functions, and so many things. But for Elementor you don’t need any of these, design your product page on the front end using the drag and drop blocks and elements. So let’s see how easily you can customize your WooCommerce product page.
Steps to custom WooCommerce product page with Elementor
Step 1: Create a product template
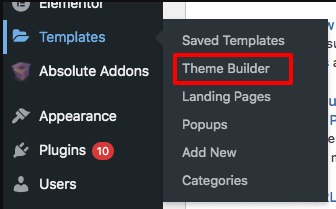
In the first steps, you need to create an Elementor product template for your custom product page. To create a product template go to Template > Theme Builder page. From here you can select your single product template or you can create your own template. Click on the insert option to add the template. When everything is done click on the publish button.
Create a page template from scratch
If you don’t want to use a premade page template then you can create your page from scratch. Elementor offers all the elements and widgets you need to create a page from scratch. You can see this tutorial to learn how to create a page with Elementor from scratch
It will take more time and effort to create your page. So the easiest solution is to choose a premade page. Elemento has so many pre-made page templates. You can also find different page templates for your product page too. See this tutorial to learn how to create a page with Elementor using a pre-built template
While creating your page make sure that it has the product gallery option. WooCommerce products have a product gallery to display the product image to the customers. Elementor also has the default image and gallery block to display product images.
Step 3: Add product widgets
After setting up your page template now you need to add different widgets to make your WooCommerce product page functional. Based on WooCommerce and Elementor you can add different options like cart option, checkout option, and others. Here are some of the options we added as an example –
- Product title
- Image
- Price
- Rating
- Reviews
- Comparison
- Variations
- Share option
- Call to Action
Every product needs detailed information, so display the product information in a way that everyone can easily find helpful. To make a perfect WooCommerce product page design, we advised you to preview it with several different products.
Step 4: Set website condition
You are selling products to your customers so you need to display all the information properly like terms & conditions, refund policy, payment process, and other information. Here are some lists you can add –
- Privacy policy
- Refund policy
- Terms & conditions
- Payment process
- Copyright
Wrapping up
Following the process, you will be able to create a custom WooCommece product page with Elementor. You can see our other articles to learn How to speed up your Elementor website
Fix the white screen of death issue in Elementor
How to fix widget panel not loading in Elementor
We hope this article will help you. If you like this article please like our Facebook page to stay connected.


Comment