How to use custom CSS in Elementor free version
Are you looking for a way to use custom CSS in Elementor free version?
Elementor is one of the popular page builders with so many features and functionalities. Custom CSS feature is one of them. You can use custom CSS anywhere in Elemenrot like in a widget, column, section, and others. Using custom CSS you can create an interactive design that can make your website unique from others.
The custom CSS feature is only available on Elementor Pro. You won’t be able to use this on your free version of Elementor. But don’t worry here in this article, we will guide you to the easiest way to use custom CSS in Elementor’s free version.
How to use custom CSS in Elementor free version
In our previous article, we discussed how to add a gradient border to the image gallery in Elementor for that article we used CSS snippets in the custom CSS field of Elementor Pro. Now we are going to add the same things without Elementor Pro. We are adding the same CSS using the free version of Elementor.
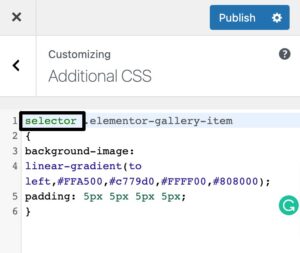
selector .elementor-gallery-item

{

background-image:

linear-gradient(to left,#FFA500,#c779d0,#FFFF00,#808000);

padding: 5px 5px 5px 5px;

}
Here to use this code you need to follow the following steps –
- Additional CSS
- Elementor CSS Id
Additional CSS in WordPress Customizer
In the first step you need to add the code in the WordPress customizer additional CSS field, For this navigate to Appearance > Customize > Additional CSS. Now enter the full CSS code on the Additional CSS field.
As we use this code for gradient border to image gallery you need to remove the selector text from the CSS code and add a unique CSS id. Here we are adding the CSS id as #gradientborder
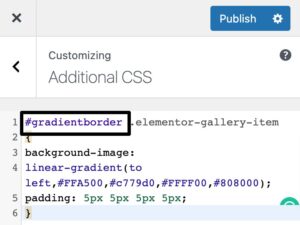
When you are done editing, click on the Publish button to save the changes.
Add Elementor CSS id
Now in the second step, you need to add a Class ID to call the CSS code you applied on the WordPress customizer additional CSS field. Open up the page with the Elementor editor and add the gallery widget. Insert your images and style it up as per your requirements.
Now navigate to the Advanced tab and then in the CSS ID field, add the CSS ID you added on the additional CSS field. Enter the gradient border in the CSS ID field as we set it in the additional CSS, At the time you add the CSS id it will have the features you added.
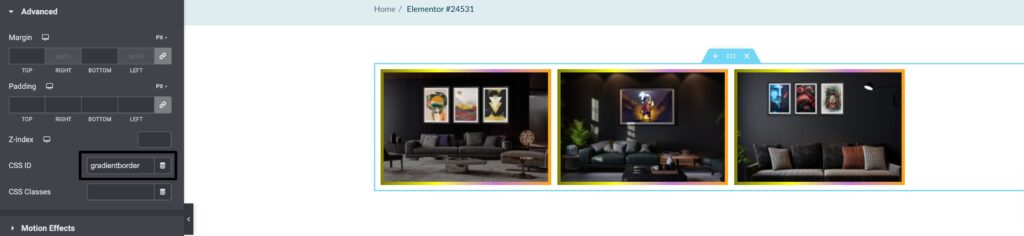
When you are done click on the Publish button to save the changes. If you want to add another image gallery with a different gradient border then you need to do the same process again. Go back to Customize > Additional CSS and paste the same code but here you can change the color value and make sure to add a different CSS ID.
Then again in Elementor, you can use the CSS ID to call the code you entered in the Additional CSS field.
Wrapping up
Following the process, you will be able to use custom CSS in Elementor free version. You can see our other articles to learn How to display copyright year dynamically in Elementor
How to Open an Elementor Popup in Gutenberg
How to create a custom image shape in Elementor
We hope this article will help you. If you like this article please like our Facebook page to stay connected.


