How to add Google map with Elementor
Looking for a way to add Google Maps with Elementor to your website? Here in this article, we will guide you to the easiest way to add Google Maps to your Elementor website.
In every business, the most important thing is to connect with the audience. A website is the best way to connect with your customers. Every website has a different section for the contact page where the owners add a Google map to locate their location and other information.
Displaying Google Maps is very important for a business to provide information and contact details. It also helps to create a better audience engagement.
Add Google map with Elementor
The easiest and quickest way to add a Google Map to your Elementor website is to use a plugin. Here in this article, we will use the WP Google Maps WordPress plugin. This plugin will enable you to add a customized Google map or Store Locator to your Elementor posts and/or pages quickly and easily with the supplied shortcode.
Install and activate the plugin and then go to the Maps option from your WordPress admin dashboard. Here you can edit the existing map. If you activate the pro version, you can add unlimited maps to your website. Click on the edit option to customize your map.

Now it will provide you with two map engines to choose from –
- OpenLayers – It doesn’t require any API key
- Google Maps – API key is required.
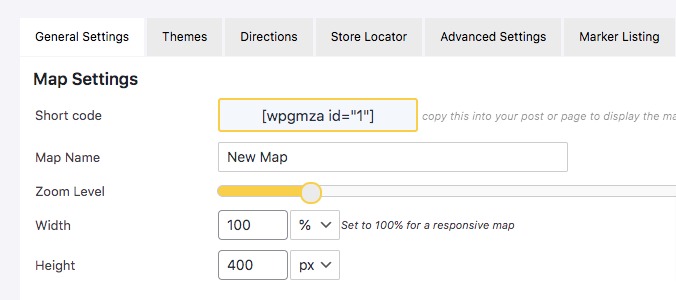
To add Google Map to your website you need to have the Google Map API key. Now in the General Settings tab, you can find different options like –
Shortcode – You need to use this shortcode to implement the map on your Elementor website.
Map Name – Add your map name here.
Zoom Level – You can change the starting zoom of your map from here.
Width & Height – From here you can set the map width and height.

From the Theme tab, you can choose the theme Presets. There are different presets themes available. You can choose any of the presets. You can add your address as a marker. You can add different markers to your website. When you are done click on the Save option to save the changes.
Implement the map in Elementor pages
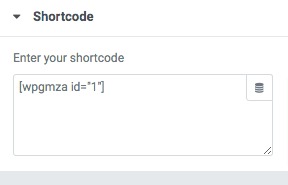
After creating the Google Map now you need to implement it in your website pages. For this, you need to copy the shortcode from the General Settings tab. Open up a page with Elementor editor where you want to add the map. Now click on the “+” icon to add a block. Now search for the Shortcode block, drag the block and drop it into your created section.

Now paste the shortcode you copied for your created Google Map. If you have added your Google Map API key successfully it will add the map to your selected pages.

Wrapping Up
Following the process, you will be able to add a Google Map to your Elementor website. You can see our other articles to learn How to integrate Mailchimp with Elementor free
How to set the Accordion widget closed by default in Elementor
How to add two buttons in Elementor side by side in the same column
We hope this article will help you. If you like this article please like our Facebook page to stay connected.


