
How to create image scroll effect in Elementor
Looking for a way to create an image scroll effect in Elementor? Here in this article, we will guide you to create an image scroll effect using Elementor on your web pages.
The image scroll effect will enable you to reveal the full image when a user hovers over the images. When you visit a website that sells website templates then you can see the full preview of the templates in image scroll effect features. With these features, you can easily show your users the full website view in a short space. Normally if you want to display a full website image it will take up huge space on your web pages. Also, it affects the design of your website. But with an image scroll effect, you can add more images in a beautiful way that can easily attract audiences.
Create image scroll effect in Elementor
Elementor does not provide any widget to add an image scroll effect. So you need to add the effect using custom CSS. The Custom CSS feature is only available with Elementor Pro. So make sure that you have upgraded to Elementor Pro.
Now open up a page with Elementor editor and click on the plus icon to add a section.

Now you need to select the column for your section. Here we are selecting the one-column section.

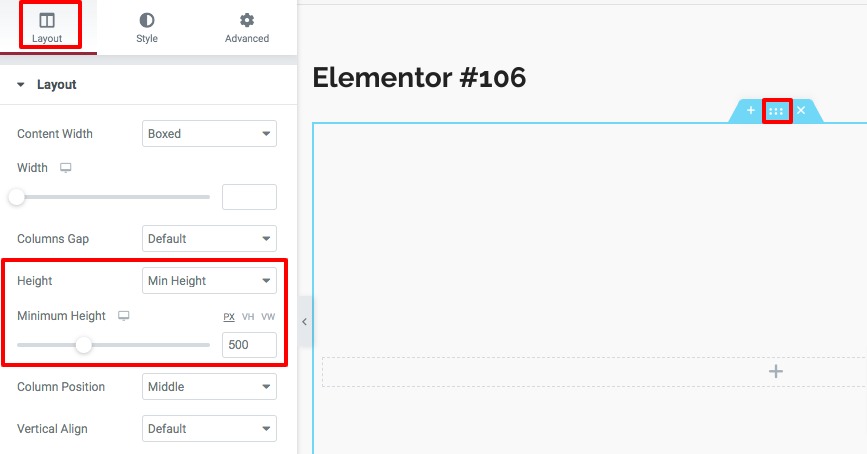
Now click on the section edit icon and from the layout, tab set the minimum height as 500.
Now from the block widget add the inner section block to your created section and delete the default column. Right-click on the column edit icon and click on the delete option to delete the primary column.

Again go to the inner section edit option and from the layout, tab set the minimum height as 500 as we showed earlier.
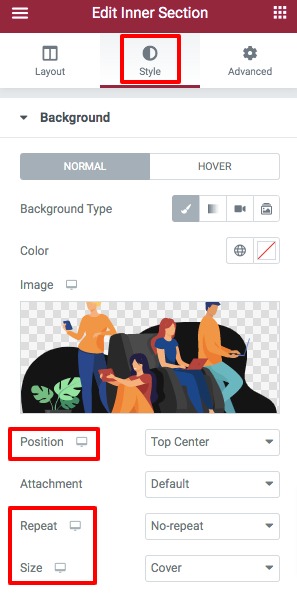
Now move on to the inner section style tab and set the background as a classic from the background option. Then you need to add your background image. From the image position option set the image position as Top Center. From the repeater option set no-repeat and set the size as the cover.
Now move on to the Advanced tab to add Custom CSS. Under the Custom CSS field add the following code.
selector{

-webkit-transition: ease-in-out 3s !important;

transition: ease-in-out 3s !important;

}

selector:hover{

background-position: center bottom !important;

}
You change the transition value to change the scrolling effect for the images. If you want to add multiple images with the same effect then you can duplicate the column and then change the background image.
Wrapping Up
Following the process, you will be able to add a scrolling image effect to your website using the Elementor page builder. You can see our other articles to learn How to use two different colors on a heading in Elementor
How to set the Accordion widget closed by default in Elementor
How to add two buttons in Elementor side by side in the same column
We hope this article will help you. If you like this article please like our Facebook page to stay connected.


